

How to Build a PVC Christmas Light Frame for Windows and Arches

Use 1" PVC for a cube style halloween lighted tunnel entrance to front porch. A single 48" window frame takes about an hour and costs roughly $15 to $25 in parts. Arches take an afternoon and run higher depending on span. Every step from cutting to anchoring is covered below.
TL;DR:
Using 1/2" PVC pipe is suitable for window frames, while 3/4" or 1" pipes are better for arches and larger spans to handle wind and weight.
Modular, Circo fittings without glue allow easy disassembly and storage, making frames reusable for multiple seasons with minimal effort. Use self-tapping screws for security and easy disassembly.
Secure anchoring with stakes or weighted bases is critical for arches spanning 6 to 10 feet to prevent flexing or tipping over. Or use Table Caps aka Screw Tab Caps if you have a place to mount them.
Weatherproof electrical connections with waterproof splices and GFCI outlets are essential for safety and long-term durability outdoors.
Painting PVC with flat spray paint enhances longevity and color options. Use Furniture Grade PVC pipe if you need special colors and longer lasting in the sun.
Table of Contents
What Materials Do You Need for a PVC Christmas Light Frame?
Pipe diameter determines everything else about your build. Half-inch PVC handles window frames and small shapes fine. It’s light enough to mount with basic brackets, and it holds standard C9 or mini-light strings without sagging. Step up to 3/4" for anything spanning more than 6 feet, and 1" for arches or walkway frames that need to resist wind. The thicker the pipe, the more weight and gust it can carry, but it also costs more and gets harder to bend for curved shapes.
Connectors decide how forgiving your build is. Elbows and T-fittings handle standard 90-degree corners; corner connectors work for tighter joints on smaller frames. For anything you plan to reuse year after year, skip the PVC cement and use self Tapping screws instead, since dry-fit joints with no glue mean you can disassemble the whole frame in minutes and stack it flat for storage. USE SLIP TEE's and SLIP CROSSES with Self-tapping screws. They allow you to slide a tee or cross onto your pipe so you don't have to cut as much PVC pipe. I'm trying to help you out here. It will save you so much time! (hint: Circo will add screws to your order, just ask them in the "order notes" when you place your order (for FREE).

Your shopping list for a basic window frame for lights:
1/2" PVC pipe (schedule 40)
Four T-connectors or corner connectors
Two to four mounting brackets or eye hooks
A tape measure, PVC pipe cutter or hacksaw, and a marker
Worked example: for a 48-inch-wide window, cut two 48" horizontal pieces and two vertical pieces sized to your window height minus about 1 inch for connector depth. That half-inch buffer at each corner keeps the frame from running long once the fittings are seated. Measure twice. A miscut piece of PVC is a wasted trip back to the hardware store, and careful measuring before buying is the single easiest way to avoid that.
How Do You Build a Window Frame Step by Step?
Building a rectangular window frame is the fastest entry point into PVC light displays, and it’s forgiving enough for a first project.
Measure and mark. Take the width and height of your window opening, subtract about an inch from each dimension for connector depth, and mark your cut lines directly on the pipe with a permanent marker.
Cut the four pieces. A PVC pipe cutter gives cleaner edges than a hacksaw, but either works. Label each piece with tape as you go so you’re not guessing later.
Dry-fit before anything else. Lay the four pieces and four corner connectors on the ground and assemble the full rectangle without force. Check that it’s square by comparing both diagonals; if they match, your corners are true.
Decide glue or no glue. For a one-season build, PVC cement locks joints permanently. For anything you want to store and reuse, stick with dry-fit connectors or furniture-grade snap fittings that hold tight without adhesive.
Attach the light strings. Drill small holes along the pipe every 6 to 8 inches and thread zip ties through, or wrap rope lights directly around the frame for a solid, continuous glow. Consumer how-to guidance also recommends broom clips as a quick, tool-free alternative for holding bulbs in place.
Mount the frame. Small L-brackets screwed into window trim work well, or you can hang the frame from shutter hardware using clips or hooks if you don’t want to drill into trim at all.
Test before dark. Plug it in during daylight so you can spot dead bulbs or loose connections while you can still see what you’re doing.
Take it down and store it flat. If you used dry-fit joints, the frame breaks back down into individual pieces in under five minutes.
Pro Tip: Snap Clamps are an easy way to adhere your lights to your frame, typically use the EZ Light Grip Snap Clamps so that you have enough flex to hold the lights to the frame.
How Do You Build Freestanding Arches and Walkway Frames?
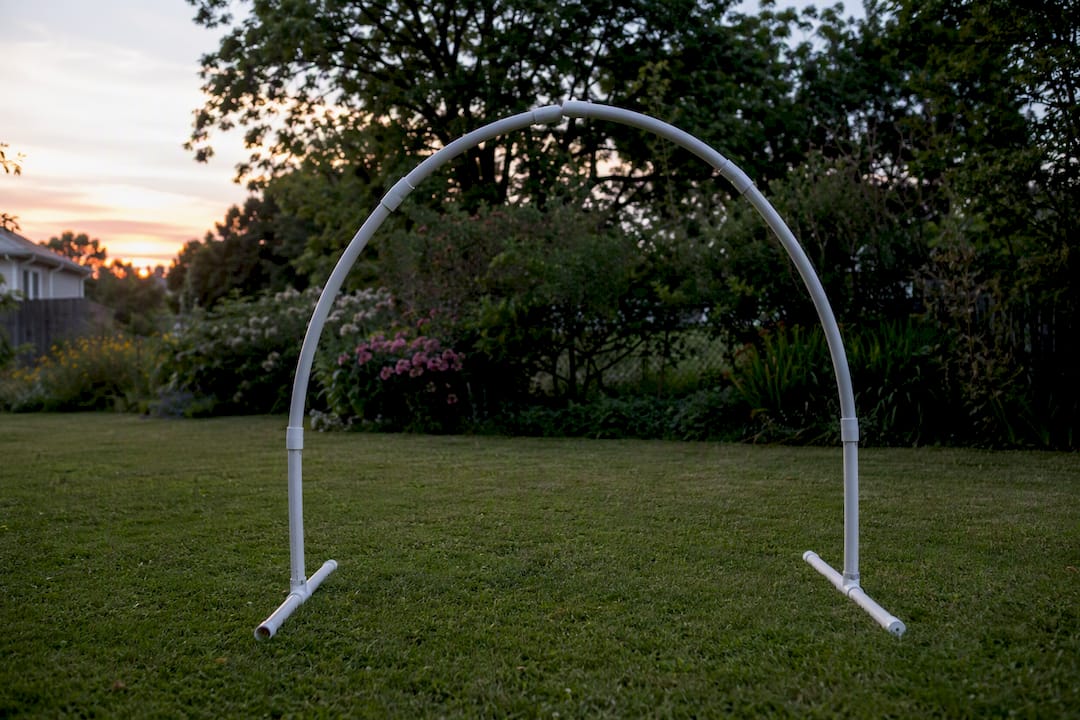
Arches introduce a stability problem window frames don’t have: nothing holding them to a wall. You’ve got two design paths. A single curved piece of heat-formed PVC gives you a smooth arch but requires a heat gun and some trial and error. Segmented construction, using several straight lengths joined at angles with elbow connectors, is far more forgiving for a first attempt and still reads as a curve from a few feet away once lit.
For spans of 6 to 10 feet, 3/4" or 1" pipe with elbow and T-connectors spaced every 2 to 3 feet gives you a frame that won’t flex or bow under its own weight. DIY archway tutorials built for yard displays typically call for 3/4" or 1" pipe cut into 10-foot segments, paired with rebar rods for anchoring. 1 inch PVC can bend somewhat easily if your width is about 5 feet. Unrelated but kinda like this guy did: (Except instead of a truck being your support for the bottom of the pipe, you need to use rebar driven into the ground at least 2 feet to handle that tension.
Getting the base secure matters more than anything else in this section:
Drive rebar stakes cut to about 3 feet, with roughly 2 foot sunk into the ground, then slide the PVC leg directly over the exposed rebar.
On concrete or a porch where you can’t drive a stake, use a weighted base instead, such as a sand-filled planter or a concrete-filled bucket with a bolted plate.
For a seasonal frame you’ll take down every year, dry-fit joints instead of cementing them, so the whole arch collapses down for off-season storage.
How Do You Attach Lights and Keep Wiring Safe Outdoors?
Zip ties remain the most reliable fastener for individual bulb clips and light string housings, especially once the pipe surface has been painted. Plastic light clips designed for gutters and shingles also snap onto PVC edges without tools. Rope lights are the exception: instead of tying them at intervals, wrap the entire run around the frame in a spiral, which hides the wire and gives a more even glow than spaced clips like this Megatree project:

Weatherproofing the electrical side is where a lot of otherwise solid builds fail. Every outdoor splice needs a connection rated for wet locations, whether that’s a waterproof wire nut, heat-shrink tubing, or purpose-built outdoor cording with a rubber gasket. Plug everything into a GFCI-protected outlet; a single overloaded circuit is one of the most common causes of holiday light failures, and outdoor PVC installs generally hold up for decades when the wiring, not the frame, is what eventually gives out.
Keep light strings under their rated wattage load; check the tag on the plug before daisy-chaining multiple strands.
Use a wireless remote controller if you’re running several frames, so you’re not running extension cords to every window.
Coil excess cord neatly behind the frame or route it down a downspout to keep plugs out of sight and out of the rain.
How Do You Finish, Store, and Maintain a PVC Light Frame?
A frame that blends into your trim during the day and comes out clean next November is the whole point of building it right the first time. Flat exterior spray paint in a color matched to your siding or window frame does double duty: it kills the glossy PVC sheen and gives zip ties more surface friction, so lights stay put through wind.
Label every piece with painter’s tape and a marker before disassembly so next year’s setup takes minutes, not guesswork.
Store flat sections on a wall-mounted rack or in a labeled bin, out of direct sunlight, which slowly degrades unpainted PVC.
Walk the frame each fall and check every connector for cracking, check zip ties for brittleness, and swap any dead bulbs.
Budget for longevity: a basic two-piece frame can cost as little as $10 to $15 in materials, and a properly stored PVC frame can outlast most string lights by a decade or more.
Pro Tip: If a zip tie still slips even on painted pipe, run a short strip of adhesive rubber tape under the tie path. It’s a permanent fix that costs pennies and takes ten seconds per spot.
Why Modular Fittings Beat Glued Joints for Seasonal Builds
Glued PVC joints are permanent, which is fine for plumbing and a real problem for a frame you take down every January. Furniture-grade fittings and specialized connectors solve that by giving you a joint tight enough for outdoor wind loads but loose enough to break down by hand.
No glue means no cure time, no fumes, and no ruined pipe if you measure wrong.
Modular corners and adjustable fittings let you dial in arch angles on-site instead of guessing before you cut.
Snap-together joints cut assembly time roughly in half compared to gluing, since you’re not waiting on anything to set.
Reusable fittings mean one set of parts serves your window frame this year and your arch next year, with no rebuild from scratch.
Downloadable project plans with exact cut lists and connector counts take the guesswork out of a first build, whether you’re sizing a single window or a full walkway display.
What Should You Check When a Frame Fails?
Most PVC light frame problems trace back to one of four causes, and each has a quick fix.
Wind is tipping or shifting the frame. Drive stakes deeper, add a second tie-down point, or widen the spacing between anchors so the frame has more resistance to twist.
Lights are sagging or zip ties keep slipping. Repaint the contact points for grip, or add a second zip tie at each stress point instead of relying on one.
A whole string went dark. Isolate sections one at a time to find the failed segment, then check the plug end for a tripped GFCI before assuming a bulb failure.
The frame flexes or bows under its own weight. That’s usually a sign you built with 1/2" pipe on a span that needed 3/4" or 1". Rebuild that section with a heavier diameter rather than adding more anchors to a frame that’s simply undersized.
Why We Build Every Seasonal Frame Around Modular Fittings
Glued joints work fine for a frame you’ll only ever build once. Almost nobody actually does that, it's also very wasteful. The frames that survive a decade of Novembers are the ones you can take apart in five minutes and put back together just as fast, which is why modular, tool-free connections make more sense for holiday displays than permanent plumbing joints ever will. Check the plans library before your next build.
— David
Get the Fittings and Plans to Build It Right the First Time
Circo Innovations makes the PVC fittings necessary to come up with the most elaborate and intuitive builds.
That same tool-free design is what makes storage painless. A frame built with snap clamps breaks down flat in minutes and goes back together the same way next season, with no cracked glue joints to work around. If you’re piecing together an arch, the 3-way elbow connector gives you a stronger corner than standard hardware-store fittings, rated for the kind of repeated outdoor use a seasonal display demands. Browse the full project plans to find a cut list sized to your window or walkway, and order the fittings you need directly from Circo Innovations to start building this weekend.
Sources
Recommended


Comments